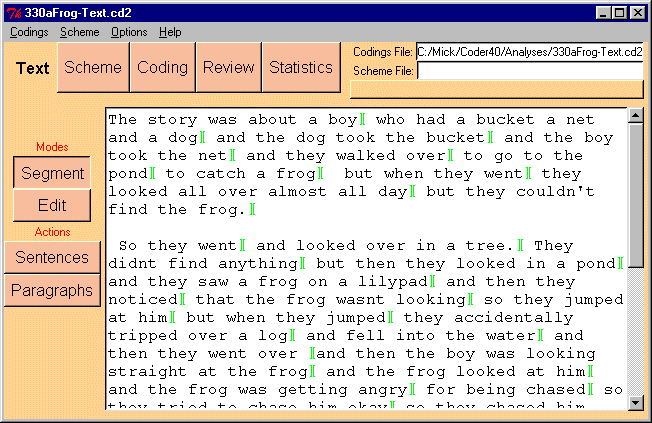
Figure 2: The Text Segmentation Interface
The text segmentation interface allows you split a newly imported plain-text file into the segments you wish to code. The same interface allows you to change segment boundaries even after you have started coding. Initially, an imported text is treated as a single segment. You can then click at the places you want segment boundaries to be made. The "Sentences" button will automatically segment at sentence boundaries.
Figure 2 shows the text Segmentation Interface. The text is shown in the main text window, and on the left are a number of buttons (the toolbar). These buttons are either mode buttons (which change how you interact with the text window) or action buttons (which actually do something directly).

Figure 2: The Text Segmentation Interface
The segmentation interface allows two modes of interaction:
There are two action buttons:
The typical process after importing a plain text file is to initially hit the Sentences button, then add in segment marks where you see fit, and delete bogus marks.
Note that if you get it wrong now, you can return from coding and change the borders.
A problem occurs with embedded elements -- cases where a rhetorically dependent stretch of text occurs within another node. For instance, we might wish to treat the embedded clause in the following as dependent on the main clause: John, -- I think you know him -- is here for two weeks. At present, the interface does not handle such cases. A simple solution is for the user to move the embedded text outside of the enclosing text.
When you are ready to start coding, hit the "Codings" button on the Interface selection bar at the top.
| Insert a single segment mark | Select Segment mode; click at the desired point. |
| Insert segment marks at end of each sentence | Click on the Sentences button. |
| Delete a segment mark | Select Segment mode; click on the segment mark to delete. |
| Changing text | Select Edit mode; edit the text (note: avoid cut/paste of text which includes segment marks). |
| Move on to coding | Hit the Coding button. |