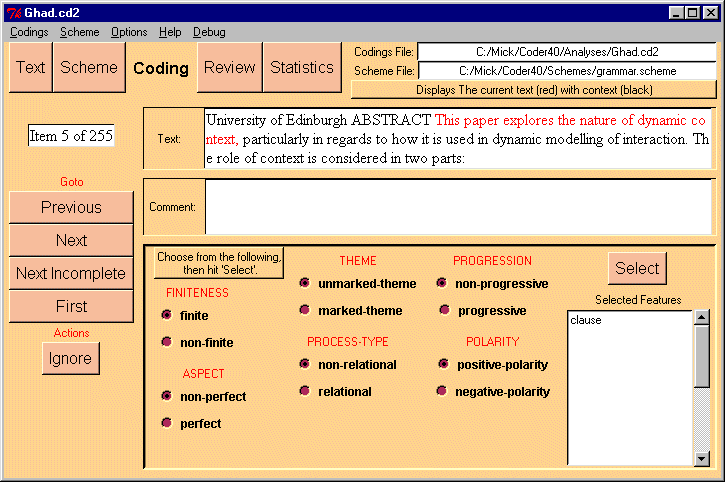
Figure 6: The Coding Window During Coding
We are now ready to start coding. When coding an item, the Coding interface will look something like figure 6. The text is shown in the Text Box.

Figure 6: The Coding Window During Coding
Choice History: There is a box at the left labeled Choice History. This holds the features selected for this item so far. At the start of the coding of an item, this will hold only one feature, the Coding Start Feature (in this case, clause). As you assign features to the unit, they will be displayed here.
To the right of this box will be displayed a number of systems from which you need to select for this item. These systems represent those to the left-most of the system network -- those which are entered directly from the Coder Start Feature. If your coding scheme is a true taxonomy (no simultaneous systems) then there may be only one system shown here. Otherwise there may be several.
Each system has a designated default. If the default feature is not appropriate for this text, select one of the other options. When all systems are appropriately coded, click the Select button. The choices made on the page are recorded, and shown in the Choice History table.
A benefit of this manner of coding is that the user only needs to act when the text being coded differs from the default value. The amount of mouse-clicks is thus reduced. Coding proceeds quite quickly.
Any new systems which further specify the selected features will then be presented. Select from these in the same manner.
Sometimes selecting one feature results in several features being added to the Choice History. If the selected feature happens to be the sole feature in the entry condition of a gate (a system with only one choice), then the entailed feature is selected automatically.
To delete features from the "Choice History'', just double-click on the relevant feature. The feature, and all the features which depend on the choice, will be removed from the Choice History. Those systems which become enterable with this new choice-history will then be displayed.
You can associate a comment with each coding. Simply type the comment into the space provided at the top of the Coder Interface. You can also change existing comments in the same way.
Sometimes we make mistakes in the segmentation of the text file, and only notice when we start coding. If this occurs, you can switch back to the Segmentation interface, change the segmentation, and return to coding. There should be no problems.
By default, as soon as you have chosen from all available choices, the Coder will advance you automatically to the next coding.
You can change this default, by unchecking "Auto Advance" under the "Options" menu. The coder will wait on a coding until you press the "Next" button.
You can also press the "Next" button before the coding is complete. - a partially complete coding will be stored. You can later return to this coding to complete it.
Note that codings are not automatically stored to disk. Any completed codings are kept in memory, until you explicitly save them by selecting "Save" from the "Codings" menu (described below).
The Coder interface offers several buttons to move between codings
You can also move around within the codings using the Review window. See section 7.
If the current segment is not one that you wish to include in your study, hit the "ignore" button, and you will not need to code it. Also, it won't be used in statistical studies.
To unignore a coding, go to the Review window, select the ignored item, and hit the "Unignore" button.
Use the "Options" menu to change some aspects of the coder's behaviour:
Auto-Advance: When coding, the system normally advances to the next coding as soon as the present one is complete. If you uncheck this option, the coder will not automatically advance to the next coding, but will wait until you explicitly press Next to advance to the next coding.
Show Context: Select this option to vary how many segments are shown around the current segment in the text-box, during coding. '0' will result in no context being shown. The current item is shown in red, the context in black.
A box at the top-left-hand corner of the Coder window (see figure 6)
tells you which coding you are working on, and how many there are in
total.